
The only caveat is that this dessert is best served the same day it is made. Once refrigerated, the custard tends to harden and loses its lovely texture.
Ingredients
For the filling:
• 6 cups milk
• 1-1/4 cup fine flour
• 6 egg yolks
• 1/2 cup sugar
• 1 tbsp. vanilla extract
• 2 tbsp. unsalted butter
For the syrup:
• 1 cup sugar
• 1 cup water
• 5 cm piece of lemon rind
• 5 cm piece of orange rind
• Juice of 1/2 a lemon
• ½ kilo phyllo pastry sheets
• ½ kilo unsalted butter, melted (for brushing)
Preparation:
Make the Filling: In a large saucepan, heat the milk over medium high heat until just boiling. Add the flour and stir with a whisk. Lower the heat to medium low.
Using a whisk, beat the egg yolks with the sugar. Ladle a cup of the warmed milk into the egg mixture to temper and then add the egg yolk mixture to the pot.
Continue to cook over medium low heat until the cream starts to thicken, stirring continuously.
When the custard has thickened, remove from heat and stir in the vanilla extract and the butter. Set aside.
Unwrap the Phyllo: Carefully remove the Phyllo roll from the plastic sleeve. Using a pair of scissors or sharp knife, cut the sheets in half to make two stacks. To prevent drying, cover one stack with wax paper and a damp paper towel while working with the other.
Preheat the oven to 350 degrees.
Assemble the Galaktoboureko: Using a pastry brush, brush the bottom and sides of a rectangular pan. You will use approximately half the phyllo sheets for the bottom of the pastry. Begin by layering sheets one by one in the bottom of the pan, making sure to brush each one thoroughly with melted butter.
When you have almost layered half the sheets, drape two sheets of phyllo so that they extend half in the pan and half out of the pan horizontally. Add the custard in an even layer on top of the sheets, smoothing the surface with a spatula. Fold the phyllo sheet flaps in over the custard layer. Add the remaining sheets on top, brushing each sheet with melted butter.
Before baking, score the top layer of phyllo (making sure not to puncture the filling layer) to enable easier cutting of pieces later. I place the pan in the freezer for about 10 to 15 minutes to harden the top layers and then use a serrated knife.
Bake in a preheated oven for 45 minutes or until the phyllo turns a deep golden color.
While the Galaktoboureko is baking, prepare the syrup: Combine the sugar and water in a saucepan and add the lemon peel and orange peel. Boil over medium high heat for approximately 10 – 15 minutes. Remove the lemon and orange peel and stir in the lemon juice. Remove from heat and set aside to cool.
Prep Time: 45 minutes, Cook Time: 45 minutes
Total Time: 1 hour, 30 minutes, Yield: Approximately 24 pieces
Caution: Do not pour hot syrup over the hot custard. Allow both to cool to room temperature and then carefully ladle the syrup over the galaktoboureko and allow time for it to be absorbed.
To read more, please visit greekfoodabout.com
BUSINESS CENTRE

XpatAthens
Galaktoboureko - Custard Pie With Phyllo Recipe
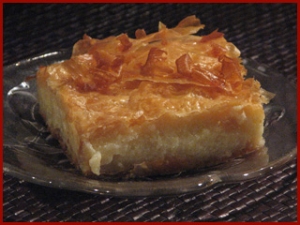
This custard pie is my absolute favorite Greek dessert. If you can get past the tongue twister name, Galaktoboureko (gah-lahk-toh-BOO-reh-koh) can easily become your favorite Greek pastry as well. It’s a divine combination of creamy custard and flaky phyllo dough that is baked to golden perfection then drenched with a lemon and orange infused syrup.
Dakos Delicious

Dakos, whether you eat it for breakfast, lunch or as a snack any time of the day, it is always wholesome and filling. To make dákos you start with bread rusks. We like the traditional barley krithári or wholemeal olikís alésios rusks with their chunky texture and wholesome flavour. The word ντάκος comes from the way the bread is prepared. This is slicing the bread loaf three quarters of the way through and then baking. Bread rusks paximádia are enjoyed throughout Greece.
Traditionally in Greece paximádia are made by cutting slices from a loaf of fresh home-made bread and then baking them again in the oven till crunchy.
As you can see dako and paximádia are very similar, the difference being how they are cut before they are cooked.
Drizzle a little water on the rusks to soften, then pore plenty of Cretan olive oil over them. Grate fresh garden tomatoes directly onto the rusks and add onion rings.
To read more, please visit we-love-crete.com
Fassolada-Greek Bean Soup
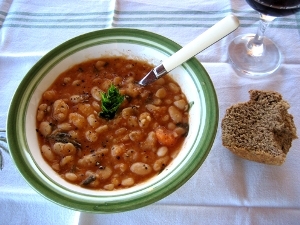
This is such a Greek food staple and yet one can never eat it at a Greek restaurant in Greece, unless it is a taverna somewhere up in the mountains where soups and stews are available to the weary travellers. There is nothing exceptional about the recipe as far as the ingredients go: beans, onion, celery, tomato, carrots, olive oil. That’s it.
Yet again, this is one of those foods that are perfect for cold weather, warm and comforting and most importantly highly nutritious. In my family we ate it together with: feta cheese, black Kalamata olives, smoked mackerel dressed in olive oil and lemon, and of course loads of bread, so it became a full meal.
If you want something less rustic, you can whizz everything in the blender and serve it as a veloute with croutons or even crispy bacon.
INGREDIENTS for 4-6 people
500gr dry white beans, soaked
2-3 carrots, sliced
1 onion, sliced
half bunch of celery, chopped
1 400g can of chopped tomatoes
1 clove garlic (optional)
olive oil
salt, pepper
DIRECTIONS
Soak the beans in warm water with a bit of salt for at least 8 hours. Drain, rinse and fill the pan again with fresh water. Bring to the boil and skim the froth.
Add all the ingredients: carrots, celery, onion, tomatoes, garlic if you are using and 1-2 tbsp of olive oil.
Boil until tender, about two hours. The fresher the beans the quicker they boil. You can also use a pressure cooker if you are really in a hurry. It will only take 10 minutes.
When the beans are ready, season well with salt and pepper. The soup should be thick and creamy. This usally occurs naturally due to the starch contained in the beans. If, however your soup turns out watery, you can easily thicken it by dissolving one tbsp of flour and letting it boil for one minute.
Serve hot with some extra pepper and olive oil on top.
KALI OREKSI!
The Best Sour Cream Substitute? Greek Yogurt

Are you having a hard time finding sour cream in Athens? Well, you can stop looking. It turns out that the best sour cream substitute, Greek yogurt, is by far the most versatile of dairy products. It is ideal to use in all types of cooking. You can use Greek yogurt to also replace cream, mayonnaise or cream cheese. You can use it cold for dips, to mix through salads, pasta or potato for a creamy finish, in ice creams or you can add it to hot meals.
Greek yogurt is an ideal yogurt for cooking as it can stand high heat without curdling. It is available in no fat, low fat and extra creamy, so there will be one to suit your needs.
Here are some suggestions for using Greek yogurt in your meals.
Makes Soups Creamy
• Chicken or vegetable soup, once cooked and blended, warm soup, remove from heat. Stand for 2-3 minutes. Stir yogurt through the soup, just long enough to warm through, then remove and serve.
• For dishes such as Beef Stroganoff, add it just at the end, stir through, then serve.
Cold Pasta Dishes
• You can use it in cold pasta salads, cooked pasta, tinned or freshly cooked fish, ham bacon or cooked chicken, diced red & green peppers, tomatoes, parsley, stir through yogurt or combination of mayonnaise and yogurt, salt and pepper to taste.
• Alternative dressing, yogurt, mayonnaise, seeded/grainy mustard, herbs – chives, parsley, etc, mix together. Add a little water if you prefer it runnier. Mix through pasta.
Hot Pasta Dishes
• Add yogurt as a sour cream substitute to the pasta sauce just before the end. Finish cooking the sauce, turn off the heat, add the yogurt and stir through until just warm. Remove and serve.
For more, please visit Ultimate Guide to Greek Food
Vegetarian Yiouvetsi

Vegetarian Yiouvetsi, with orzo and fresh veggies, is delicious, hearty, healthy, and perfect for spring!
Ingredients
1/2 cup plus 3 tablespoons extra virgin Greek olive oil
2 large red onions, finely chopped
½ teaspoon cinnamon powder
4 large carrots, peeled and diced
1 lb. / 450 g orzo or Greek kritharaki
3 cups chopped, canned or fresh plum tomatoes
2 bay leaves
3 sprigs fresh or dried oregano
Salt and pepper to taste
1 ½ lbs./ 750 g zucchini, diced
2 garlic cloves
2 tablespoons balsamic vinegar
Grated Greek kefalotyri cheese, parmesan, or other hard cheese
Instructions
1 Heat 2 tablespoons olive oil in a large skillet and sauté the onions for 10 minutes over medium heat, until soft. Add the cinnamon, stir, and gently cook the onions for another 3-4 minutes, until lightly colored. Remove and set aside the onions. Wipe the skillet dry.
2 Heat 2 tablespoons more of olive oil in the same skillet over low heat and cook the carrots for 15 minutes, until softened but al dente. Stir occasionally.
3 Preheat the oven to 375F/190C.
4 Bring 6 cups of salted water to a rolling boil and cook the orzo for about 5 minutes, until al dente.
5 Transfer the orzo and cooking liquid to a large baking pan. Mix in the onions, carrots, tomatoes, 2 tablespoons of olive oil, bay leaves, and oregano. Season with salt and pepper. Bake, covered, for 20-25 minutes.
6 In the meantime, heat two more tablespoons of olive oil in the skillet and sauté the zucchini. Add the garlic and stir. Add this mixture to the orzo. Add a little hot water to the baking pan if necessary, to keep the pasta from drying out. Continue baking the orzo for another 40 minutes to one hour, or until almost all the liquid has been absorbed. Remove, stir in remaining olive oil, and serve, garnished, of desired, with grated cheese.
greek food - greek cooking - greek recipes by diane kochilas http://www.dianekochilas.com/
Kokkinisto Me Araka Beef Casserole Gravy With Peas

The one reason was that they never only cooked one dish. They prepared several dishes just as the Chinese do, enjoying different flavours. The other reason was that these dishes are somewhat "heavy" to digest, so they ate little of many dishes ... You choose how you consume it , either way you will enjoy it !! It's even more tasty if you use mutton or lambs' front leg!
Ingredients
• 800 gr beef chuck or topside , rinsed and cut into 3cm cubes
• 1 kg fresh peas ( when removed from shell ) or frozen ( pity !! )
• 1 bay leaf
• 2 medium onions, peeled, rinsed
• 4 tbsp fresh parsley
• 1 handful of fresh dill. This ingredient characterises this dish!
• 2 large tomatoes, ripe but firm, rinsed
• 1 tsp sweet paprika
• salt pepper to your taste
• 1/2 tsp hot paprika (optional, not original)
• 2 cups extra virgin olive oil
Directions
• Sautee the meet until all its juices have evaporated .
• Blend or finely chop the tomatoes , parsley and dill and toss them in the pan .
• Stir until boiling and add 2 mugs of hot water and add salt and pepper .
• Lower your temp an simmer for 60 min , checking and stirring occasionly .
• Add peas and paprika and slowly simmer until peas are done and ALL water has evaporated , leaving only oil at the bottom of your sauce pan .
Kali orexi ( bon appetite ) !!
By Hungerhealer
www.grouprecipes.com
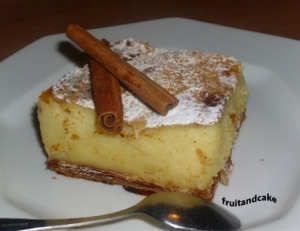
Sweet Milk Pie-Galatopita In Greek
INGREDIENTS:
1 1/2 litre of milk
5 eggs, beaten
1 cup of sugar
1 cup of semolina
zest of 1 orange
2 tbsp of butter
HOW TO:
In a pot, pour the milk and add the sugar.
Place the pot on the stove and on low heat add the semolina.
Stir constantly for about 10 minutes until it becomes a thick cream.
Remove from the fire and let it cool down a bit.
After the cream cools down a bit, add the orange zest, beaten eggs and butter.
Stir well to mix all ingredients.
Spread the cream in a small baking pan and bake at 180 degrees for 60 minutes or until brown on the top.
Let it cool down a bit and then cut in pieces.
Garnish by sprinkling some powder sugar and powder cinnamon on top.
EXTRA TIP:
You may also serve with homemade marmalade or spoon sweet. Your “galatopita” will taste like paradise!!!
fruitandcake.com
Beef Kebabs In Yogurt Sauce - Kebabs Yiaourtlou

I first enjoyed this dish in Athens and couldn’t believe I had never tasted it before. A warm fresh pita is topped with savory kebabs then bathed in a creamy yogurt sauce. On top of that is a savory tomato sauce with some extra paprika sprinkled on top. This can be served with rice pilaf or mashed potatoes. Be sure to have some extra pita bread on hand for dipping in the delicious sauce.
Ingredients:
For the kebabs:
1 kilo ground beef (can be mixed with ground lamb or ground pork)
2 large onions, shredded on a box grater (with liquid)
2 cloves garlic, finely minced
1/2 cup bread crumbs
1/2 cup chopped fresh parsley
1/2 tbsp. paprika (plus more for sprinkling)
1/2 tbsp. cayenne pepper
1 tsp. cumin
salt and black pepper to taste
To read more, please visit greekfood.about.com
By Lynn Livanos Athan
Kourkoumpinia Recipe

Old traditional and easy sweet that I hope is liked if not by all at least to most … if you haven’t tried them this is the occasion therefore to make them for your family, to offer them as a gift to your loved ones and friends, and especially for the fasting period elapsing as they’re ideal. As sweets they are cheap to make as they don’t need many ingredients. Try them!!!
INGREDIENTS:
1/2 kg crust phyllo (for pastries and pies)
2/3 tea cups olive
INGREDIENTS FOR THE SYRUP:
425 gr. sugar
200 ml water
2 vanilla
1 pinch cinnamon
few drops of lemon juice
A few drops of orange juice
To read the rest of the recipe, please visit deliciousrecipesofgogo.blogspot.gr
Moussaka Burgers

With the long weekend coming up I have been thinking about grilling and in particular about these moussaka burgers. Moussaka is a tasty Mediterranean dish that is typically made with layers of eggplant, meat, a tomato sauce and a cheese bechamel sauce and I have been wanting to try making burgers with these flavours for a while now.
I started the burgers off by making a tomato sauce with the hints of cinnamon and allspice that moussaka often has and then I moved on to make a simple bechamel sauce with plenty of melted melted cheese. Up next were the patties which I kept nice and simple, once again seasoning with hints of cinnamon and allspice, and the last component was slices of eggplant that I grilled along with the patties.
All said and done these burgers are amazingly good and they definitely taste like moussaka, only better! These burgers take a bit of time to make but you can easily make the sauces and patties a day ahead and then just warm the sauces and grill the patties and eggplant of the day of your get together with minimal effort. I served the moussaka burgers with a fresh Greek salad.
Servings: 4
Prep Time: 10 minutes - Cook Time: 45 minutes - Total Time: 55 minutes
INGREDIENTS
For the tomato sauce:
1 tablespoon olive oil
1 small onion, diced
2 cloves garlic, chopped
2 cups tomato (fresh or canned), pureed
1 teaspoon oregano
1/4 teaspoon cinnamon
1/4 teaspoon allspice
salt and pepper to taste
For the bechamel cheese sauce:
2 tablespoons butter
2 tablespoons flour
1 cup milk
1/2 cup graviera or gruyere or parmigiano reggiano (parmsan), grated
1/4 teaspoon nutmeg
1/8 teaspoon cayenne
salt and pepper to taste
For the burgers:
1 1/4 pounds ground beef or lamb
1/4 cup onion, grated
2 cloves garlic, chopped
1/4 teaspoon cinnamon
1/4 teaspoon allspice
salt and pepper to taste
4 slices eggplant
4 buns
DIRECTIONS
For the tomato sauce:
Heat the oil in a pan over medium heat, add the onion and cook until tender, about 5-7 minutes.
Add the garlic and cook until fragrant, about a minute.
Add the pureed tomato, oregano, cinnamon, allspice, salt and pepper and simmer until it thickens, about 5 minutes.
For the bechamel cheese sauce:
Melt the butter in a pan over medium heat and cook until it turns a light golden brown, about 2-3 minutes.
Add the flour and simmer until it turns a light golden brown, about 2-3 minutes.
Add the milk and simmer until it thickens, about 5 minutes.
Add the cheese and let it melt.
Season with nutmeg, cayenne, salt and pepper to taste.
For the burgers:
Mix the meat, onion, cinnamon, allspice, salt and pepper, form patties and grill or pan-fry over medium-high heat (or broil) until cooked, about 3-5 minutes per side.
Brush the eggplant with oil and grill or pan-fry over medium-high heat (or broil) until tender, about 5 minutes. Lightly toast the buns, assemble the burgers with the eggplant, patties, tomato sauce and cheese sauce and enjoy!
By Kevin Lynch
For more information, please visit www.closetcooking.com